Muleta para niños con palo de escoba / Children's Crutch (broomstick)
Por favor imprime solo cuando sea necesario
Descripción
🌎 English
🩼 Muleta para niños con palo de escoba / Children's Crutch (broomstick)
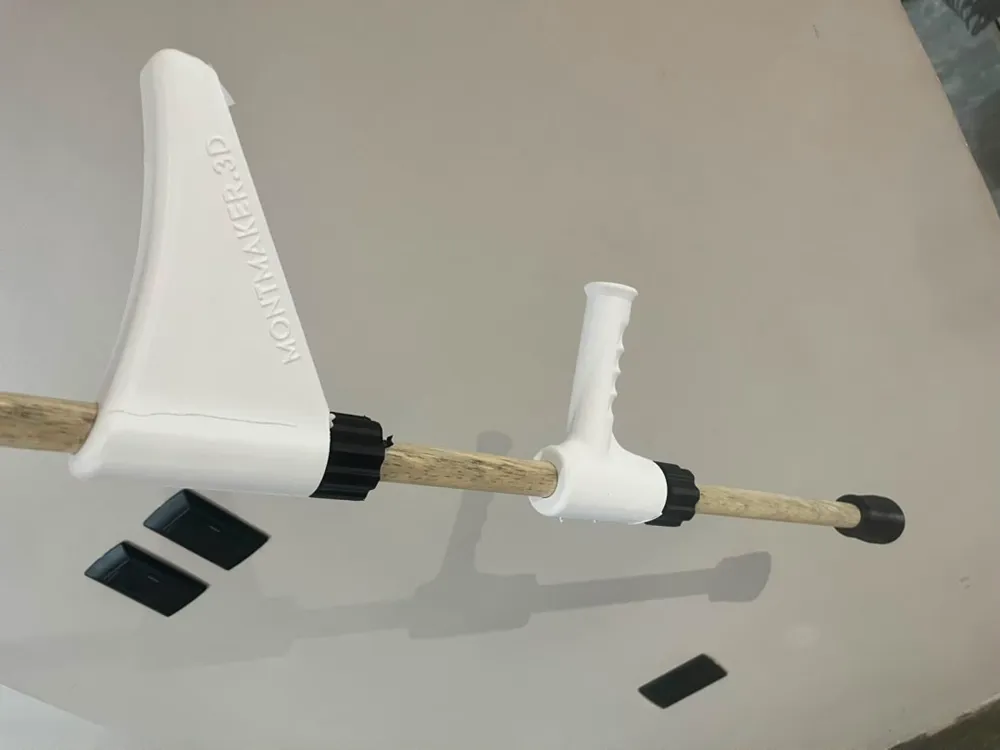
This part is a 3D-printed crutch for children for earthquake relief in Venezuela. It was designed in Venezuela by Montmaker.3D and uses a common broomstick as the shaft, so any maker can reproduce it from home and help children who need mobility support. The design was mechanically evaluated for PETG, so PETG or a stronger material is recommended.
- 🔗 View the model on MakerWorld
- 📸 Designer on Instagram: @montmaker.3d
⚠️ Please print only when needed
A message from the designer: print this only if it is necessary. An aluminum crutch is always preferable; if one is not available, use this as a temporary solution. Please print it only when someone is specifically asking for this part.
❗ Do not modify the file. If you modify it, the designer is not responsible for any harm caused.
🧰 Materials needed
- 🔩 Drywall self-tapping screws, 3/4" (20 mm) long or shorter x 2. Use the black ones sold at the hardware store.
- 🧹 Broomstick, 22 mm diameter x 1.
- 🧵 TPU base piece (printed, see below).
🖨️ How to print it
- 🧵 Print in PETG or stronger (do NOT use PLA). Use TPU for the base.
- 📥 Download the .3mf and use the settings exactly as they are provided. If you do not have Bambu Studio, please install it and adapt the model before printing: this model has modifiers that ensure rigidity.
- 🎨 Personalize it with stickers and encouraging messages: this is for children.
- 📦 Once printed and assembled, it is ready to be dropped off at a collection center.
🔧 Step-by-step assembly
- Print the ring first to confirm the broomstick diameter matches the model. If it does not match, reduce the model by at most 2%; increasing the size is not a problem. The correct diameter offers enough friction to move it and must not be loose. Do not print the model without doing this step, the model must match the diameter of the stick you are using. Do not print the model generically, or the diameter will not match.
- Place the TPU piece at the bottom, like on a normal broom. There is no need to tighten more than necessary.
- Insert the first nut with the wide part facing down and the thin part facing up, and set it at the patient's height (more height recommendations coming soon).
- Insert the lower handle.
- Tighten the nut gently until it no longer turns gently, then turn it 1/4 turn by hand. Do not use tools. Make sure it does not slide. DO NOT OVER-TIGHTEN. If it slides, you did not follow the step 1 recommendation correctly.
- Insert the second nut as in step 3.
- Insert the upper handle.
- Repeat step 5.
- With a screwdriver, drive 2 drywall screws (max 3/4" / 20 mm long) into the upper handle. Use the black ones sold at the nearest hardware store.
- Tighten the screws with a screwdriver until they bite into the stick, making sure it sits at the patient's height.
📝 Note: for pre-assembly, please do not put the screws in.
🧹 Choosing the broomstick
- ❌ Avoid sticks made of compressed wood (white ones).
- ❌ Avoid splintered or cracked sticks.
- ❌ Avoid sticks with knots.
- ❌ Avoid bent sticks.
- ❌ Avoid old or worn-out sticks.
- 🔊 Tap the stick from 10 cm up and let it drop for a sound test: it should sound solid.
💜 Credits
Designed and shared on MakerWorld with love by Montmaker.3D (@montmaker.3d). Thank you for making this design freely available to the maker community.
💬 For any comments or improvements, please post them directly on the MakerWorld page so they reach the designer.
Thank you for printing and helping. We are counting on your solidarity! 💚
🌎 Español
🩼 Muleta para niños con palo de escoba / Children's Crutch (broomstick)
Esta pieza es una muleta para niños impresa en 3D para la ayuda tras los terremotos en Venezuela. Fue diseñada en Venezuela por Montmaker.3D y usa un palo de escoba común como cuerpo, para que cualquier maker pueda reproducirla desde casa y ayudar a los niños que necesitan apoyo para movilizarse. El diseño fue evaluado mecánicamente para PETG, por lo que se recomienda imprimir en PETG o un material superior.
- 🔗 Ver el modelo en MakerWorld
- 📸 Diseñador en Instagram: @montmaker.3d
⚠️ Por favor imprime solo cuando sea necesario
Un mensaje del diseñador: imprime esto SOLO si es necesario. Siempre es preferible una muleta de aluminio; si no está disponible, usa esta de forma temporal. Por favor imprímela solo cuando alguien esté pidiendo específicamente esta pieza.
❗ No modifiques el archivo. Si lo haces, el diseñador no se hace responsable por cualquier perjuicio ocasionado.
🧰 Materiales necesarios
- 🔩 Tornillos tirafondo de drywall, de 3/4" (20 mm) de longitud o inferior x 2. Usa los negros que venden en la ferretería.
- 🧹 Palo de escoba, 22 mm de diámetro x 1.
- 🧵 Pieza base de TPU (impresa, ver abajo).
🖨️ Cómo imprimirla
- 🧵 Imprime en PETG o superior (NO uses PLA). Usa TPU para la base.
- 📥 Descarga el .3mf y usa las configuraciones tal como se presentan ahí. Si no tienes Bambu Studio, por favor instálalo y adapta el modelo antes de imprimir: este modelo tiene modificadores que aseguran la rigidez.
- 🎨 Personalízala con stickers y mensajes de aliento: esto va para niños.
- 📦 Una vez impresa y armada, está lista para entregarse en un centro de acopio.
🔧 Armado paso a paso
- Imprime primero el aro para asegurar que el diámetro del palo de escoba coincida con el modelo. Si no coincide, reduce el modelo máximo un 2%; para incrementar el tamaño no hay problema. El diámetro correcto es el que ofrece fricción suficiente para moverlo y no debe quedar suelto. No imprimas el modelo sin hacer este paso, el modelo debe coincidir con el diámetro del palo que estés usando. No imprimas el modelo genéricamente, ya que el diámetro no coincidirá.
- Coloca la pieza de TPU abajo, como si fuera una escoba normal. No es necesario apretar más de lo suficiente.
- Introduce la primera tuerca con la parte ancha hacia abajo y la parte fina hacia arriba, colócala a la altura del paciente (próximamente más recomendaciones sobre las alturas).
- Introduce el mango inferior.
- Aprieta la tuerca gentilmente hasta que ya no gire gentilmente, luego gira 1/4 de vuelta con la mano. No uses herramientas. Asegúrate de que no deslice. NO SOBRE APRIETES. SI SE DESLIZA ES QUE NO SEGUISTE BIEN LA RECOMENDACIÓN DEL PASO 1.
- Introduce la 2da tuerca tal como el paso 3.
- Introduce el mango superior.
- Repite el paso 5.
- Con un destornillador, introduce 2 tornillos tirafondo de drywall (máximo 3/4" / 20 mm de longitud) en el mango superior. Usa los de color negro que venden en la ferretería más cercana.
- Aprieta los tornillos tirafondo con un destornillador hasta que entren en el palo, asegurándote de que quede a la altura del paciente.
📝 Nota: para el preensamblado, por favor no coloques los tornillos.
🧹 Selección del palo de escoba
- ❌ Evita el uso de palos de madera comprimida (blancos).
- ❌ Evita el uso de palos astillados o con fisuras.
- ❌ Evita el uso de palos con nudos.
- ❌ Evita el uso de palos doblados.
- ❌ Evita el uso de palos viejos o desgastados.
- 🔊 Golpea el palo a 10 cm de altura y déjalo caer para una prueba de sonido: debe sonar como algo sólido.
💜 Créditos
Diseñada y compartida en MakerWorld con amor por Montmaker.3D (@montmaker.3d). Gracias por poner este diseño a disposición de la comunidad maker de forma gratuita.
💬 Para cualquier comentario o mejora, por favor publícalo directamente en la página de MakerWorld para que le llegue al diseñador.
Gracias por imprimir y ayudar. ¡Contamos con tu solidaridad! 💚
Comentarios y actividad
Deja una nota para la comunidad o sigue la actividad de esta pieza.
Inicia sesión para dejar un comentario.
Aún no hay actividad.
Un mensaje del diseñador: imprime esto SOLO si es necesario. Siempre es preferible una muleta de aluminio; si no está disponible, usa esta de forma temporal. Por favor imprímela solo cuando alguien esté pidiendo específicamente esta pieza.